Showing posts with label painting. Show all posts

Saturday, August 6, 2011

Painting whimsical animals


Here are some ideas that you can take to create whimsical animal paintings.  The imperfectness of the painting is what makes it so enchanting. Happy accidents become interesting features and clashing colors convey a sense of whimsy.  For each painting I have done, I give examples of techniques that can be used to achieve a similar look.
P6190002
L’ornithologue (the ornithologist)
Draw the outline of your animal with a hot glue gun.  Exaggerate some of the features.  Once dry, draw over the glue with permanent felts in various colors.  Draw in certain sections of the animal with oil pastels.  Don`t be afraid to mix up the colors.  When finished, paint over the oil pastels with acrylic paints.  Once dry, scratch designs into your animal such as feathers, fur, doodles, etc.  Afterwards, finger paint the negative space surrounding your animal.  Leave approximately half an inch to an inch of space between your animal and the finger paint.  This will frame your subject.  Add a glaze or a wash of color over the entire negative space.  Finish off by touching up a few features.
P6190007
Minou volant (flying kitty)
First thing, your going to need a piece of paper and a pencil.  Think of the animal you would like to paint.  Now try simplifying the animal down to two or three lines.  One line is even better.  In this painting, I simplified down to two closed lines: the body and the face.  Once you’ve got your shape down, prepare the background of your painting by tearing up strips of paper and applying them to the canvas.  It can be paper from an old book, a magazine of maybe even gift paper.  Inspiring yourself from the paper you have just chosen, use a hint of color in the white paint that will be apply to cover the entire background.  It can be opaque or translucent.  Now you can draw the simplified version of your animal with a charcoal or lead pencil.  Paint your animal with the colors of your choice and work the background creatively by inspiring yourself from the shapes and colors of the strips of paper that have been applied previously to the canvas.  Smudge oil pastel on painting and etch designs in it if you want.  You could also stamp the background and play up empty vs. full spaces.
P6190008
Ma belle Chanelle (My beautiful Chanelle)
Use the glue gun technique again, but paint the outline instead of drawing it with permanent felt pens.  To create the background, use soft gel and apply a thick coat with a painting knife, making sure to create a lot of texture.  Paint animal with acrylics and add doodles.  When background is dry add a few washes of colors.  The texture will prevent the paint from drying uniformly, creating an interesting background.  Finally, the clouds where painted on which the cat is sitting and the doodles repeated.
P6190006
Bulles de rêves, bulles de chats (Dream bubbles, cat bubbles)
Again, the glue gun technique is used and the rest was painted using acrylics.
Share/Bookmark

Monday, April 25, 2011

Black and white: cells and planets

I've been painting as usual.  I just finished taking a creative class called : Black and White, cells and planets.  It was fun even though black and white isn`t really my thing!

These two next mix-media paintings are my favorite ones.  The first is called "Puckered up" because it reminds me of a little puckered up face.  Maybe after eating a really sour candy?  I used string gel to create those smooth and unbroken white circle lines.  Also, I used several different types of fabric and paper to create the circles.  The objective was to create texture.  This painting was also just an exercise, but it turned out great!


Puckered up
  This next one was created over a previous exercise that I had done when exploring textures and materials.  I really didn't like the exercises end result.  I also had a lot of leftovers from cutting so many circles out of all these papers I used for another painting.  I figured that one ugly exercise + a lot of left over paper could = something interesting.  Indeed, it turns out that this is one of my favorite mix-media paintings ever! 

I really like how things from the exploration/exercise I did peer out from under all that paper.  I also like it because it's really 3D.  I call it "Squares and Cells".

Squares and cells

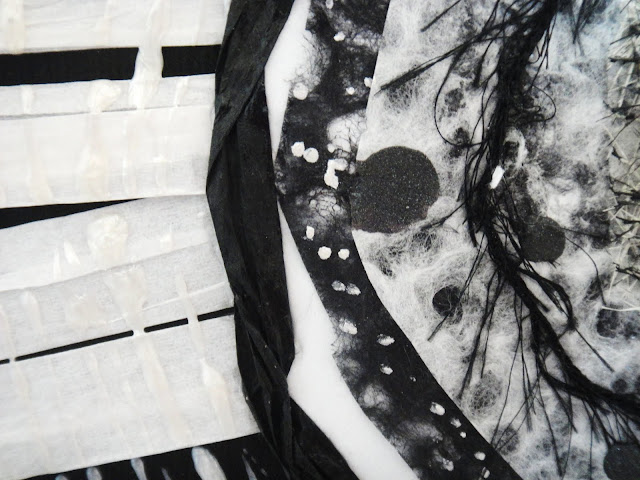
This next one is called "Comet", and if you haven't guessed why, it's because of the frilly tail that is located under the circle.  Now you might have a hard time figuring out the shape of this one, it's because the circle does indeed poke out of the canvas.


Comet

The closup reveals the materials used: some frilly ribon, fiber paper, some black and white lace papers, and black and white paper ribon.  I also used the string gel with some pearl colored acrylic paint over the white paper ribbon.


Comet closeup
This next one is called "The sheep". It"s pretty self-explanotory.


The Sheep

I put this closeup so that you may see the material used.  It's really paper maché material that hasen't been soaked in water.  To make it stay put, I put some acrylic medium over it.

The sheep closeup

This painting is called "Three little moons", because it reminds me of a planet with three moons in the sky.  An interesting tidbit about his painting is that I intentionally left some lace paper peer out from the edges.

Three little moons

And the last painting is called "Three little cells".  I used so many different kinds of paper to do the cells, which is what makes it neat.

Three little cells

Hope you enjoyed!
Krysthle Poitras


Share/Bookmark

Friday, November 19, 2010

Religious Icon Self-Portrait

This one did not start out to be a religious icon.  Actually, I was just painting my hair in geometric forms, and someone pointed out to me that it kind of looked like those windows in churches, like a religious icon.  I have since redone the hair, maybe like 3 or 4 times.  Had to get it perfect.  I have to say that I’m not a deeply religious person, so this it’s kind of funny to me to look at this one.  Some people who know me well might think this is a parody of religion.  It is whatever YOU want it to be.  To me, it’s just another painting that took an interesting twist!

religious icon big
Share/Bookmark

Thursday, November 18, 2010

Tryptic Self-Portrait

Lately, I created tryptic self-portrait.  I really like the concept of having three images to form a whole.  It all came together out of the blue (pun intended: notice that I used a lot of blue in it).  I went shopping at a local art supplier (DeSerres: http://www.desseres.ca/) and found these beautiful blue large format papers.
large format paper 2large format paperlarge format paper 3
As well, I had raided a wallpaper book by Ralph Lauren and found this lovely wall covering with New York buildings, sites and landmarks.  I additionally found two scrapbooking pages that where in theme with what I was doing, so I cut them up and did this big collage with all the material I found.  And the result:
tryptic 1
tryptic 2
673_3706
Here are some close-ups of my favourite details from the tryptic.
Postal cards:
little details I like 4 little details I like 1
Landmark and two ladies, one peering from behind my hair:
little details I like 2little details I like 6 little details I like 3
And the cool large format papers I was talking about, here are 4 kinds, and a piece of scrapbook paper with an old feel to it.
little details I like 5

Share/Bookmark

Thursday, November 4, 2010

Self-portrait exercises

I’ve been keeping busy with self-portrait exercises.  These are simple to realize.  Just photocopy some of your favourite pictures and follow these exercises.
Main tools that will be needed for all exercises are: paint (I choose acrylic), paint brushes, gloss acrylic medium, an “exacto” knife, scissors, tissue paper, textured surfaces, dry and oil pastels, cotton swabs, coloring pencils, felts, and anything else that can be painted with, coloured, or glued onto your self-portrait.
1. My alien self. Also one of my favourite exercises. I love the result.  I actually did this one thinking of a Halloween theme.  You can also try transforming yourself into a witch, a ghost, a zombie, or whatever!
alien
2. The left-hand drawing (or right-hand drawing if you’re a lefty).  First, you’ll need a mirror so that you can see yourself. You’ll need to draw with the opposite hand that you are used to using.  Don’t put in too much detail, just keep it simple.  Once finished, use dry pastel to outline your portrait.  Finally use gesso or water to smudge the color you have applied.
left hand
3. Pointillism portrait. Use a small round brush, cotton swabs or anything that will create small round dots of paint.  Fill in your self-portrait.  Try using two colors per section to create depth.
pointillism
4. Written on me.  Use markers with thin tips to write on yourself whatever comes to mind.  This exercise can go two ways: either you color with the writing (like i have done), or you can just paint yourself and then put some writing wherever you feel like it.
written 1
written 2 written 4
5. If I was a cat.  Use some sand paper to lightly sand out an area of the portrait.  Use a pencil to draw in new area as desired.  Optionally, you can continue by adding a light wash of gesso over the portrait, and then paint over it as I did.
cat
6. Make it textured.  Use textures surfaces to draw yourself with colour pencils.  Makes for interesting and neat effects.
texture
texture 2
7. Crumpled.  Crumple a photocopy of yourself.  Then un-crumple it and use the new texture to create effects.  you can do this by using oil pastels and lightly rubbing against the ridges of the crumples.  Add washes of different colours to the portrait for more colour.
crumpled
8. 1930’s movie star.  Use glue or a binding acrylic medium (such as gloss acrylic medium) to glue on a white tissue (gift wrap) paper.  When dry, use acrylic paint to put emphasis on the facial traits.
1930
9. Ghost picture.  Use glue or a binding acrylic medium (such as gloss acrylic medium) to glue on a white tissue (gift wrap) paper.  Make sure to apply some medium on top of the tissue paper too.  But don’t press too hard when applying, you don’t want it to become transparent.  Before it dries out, use your finger to rub against the tissue paper as to create small tears here and there.  Once dry, use a glazing medium with a bit of black paint to create a sheer colour.  Apply to prominent facial traits.
ghost
10.  3D portrait.  You’ll need some cardboard for this one.  Cut two square or rectangular pieces of the same size.  On each side, glue on a photocopy of your portrait, that is a total of 4 portraits.  Color, paint, draw or collage your portrait.  When ready, cut a slit from the top (middle) to the middle (middle) of one of the cardboards.  Do the same but from the bottom up of the second.  you should be able to slip each one into the other to create a 3D portrait.
3d 1 3d 2 3d 3 3d 4 
11.  Transparencies.  Go to your local printing shop and make transparencies of your portrait.  Use markers or paint to fill in your portrait.
transp 1 transp 2
12.  Geometrics.  Cut out geometric forms from your portrait.  Be creative, then paint in the shapes, add a wash or two of colour, or do whatever you want to.
geometric
13.  Distorted.  Cut your portrait into strips and rearrange them to create a distorted portrait.
distorted
14.  Negatives.  Just like photo negatives, the colors of my portrait have been reversed.  I only used black and white to convey a minimalist feeling, but you can use as many colours as you want.
color
Share/Bookmark

Sunday, October 24, 2010

Children paintings

Some children paintings I’ve recently done for some cousins.

butterfly 1

lady bug 2

ladybug 1

Share/Bookmark