Sunday, August 7, 2011

CardMaker Kit-of-the-Month club: Friendship Blooms Quick Review


I was so happy when I received my first CardMaker Kit-of-the-Month in the mail.  I had been waiting for it.  The concept if very interesting.  Each month, you will receive a card-making kit in the mail.  The kit comes with all the necessary materials (card blanks and envelopes, printed papers, a die-cut sheet, clear acrylic stamps, flowers, brads, ribbon, glitter and sandpaper).  They also give you a free gift with the first kit (a bone folder, an acrylic bloc and a versatile card making tool with three different tips).  Also included is a booklet with a technique guide and step-by-step sample card projects.
The showcased technique for the Friendship Blooms is sanding.  This kit was fun and simple and will appeal to new or experienced card makers.
What I liked:
- The premade cards had awesome shapes
- The kit had all the necessary materials to complete the projects
- The guide was comprehensive and easy to follow
- The stamp set has nice stamps
- I personally like glitter
- Learned a new technique
What I didn't like:
- Printed paper wasn't very thick.  I prefer thick papers.
- Only 10  cards to make (which is actually reasonable since the first kit if half-price off, but I  enjoyed making those cards so much that I was sad when I had finished them all!)
Here are some examples of the cards I made:
IMG_0216
IMG_0217
IMG_0218
IMG_0219
IMG_0220
IMG_0222
IMG_0223
P6190011

Krysthle Poitras
Share/Bookmark

Saturday, August 6, 2011

Scrapbooking layouts


These layouts were created using the Creative Memories Travel album series.  Its not available anymore, but you can still get some inspiration from it!
DSC00338
DSC00339
DSC00340
DSC00341
DSC00342
DSC00343
DSC00344
DSC00347
DSC00346
Share/Bookmark

Painting whimsical animals


Here are some ideas that you can take to create whimsical animal paintings.  The imperfectness of the painting is what makes it so enchanting. Happy accidents become interesting features and clashing colors convey a sense of whimsy.  For each painting I have done, I give examples of techniques that can be used to achieve a similar look.
P6190002
L’ornithologue (the ornithologist)
Draw the outline of your animal with a hot glue gun.  Exaggerate some of the features.  Once dry, draw over the glue with permanent felts in various colors.  Draw in certain sections of the animal with oil pastels.  Don`t be afraid to mix up the colors.  When finished, paint over the oil pastels with acrylic paints.  Once dry, scratch designs into your animal such as feathers, fur, doodles, etc.  Afterwards, finger paint the negative space surrounding your animal.  Leave approximately half an inch to an inch of space between your animal and the finger paint.  This will frame your subject.  Add a glaze or a wash of color over the entire negative space.  Finish off by touching up a few features.
P6190007
Minou volant (flying kitty)
First thing, your going to need a piece of paper and a pencil.  Think of the animal you would like to paint.  Now try simplifying the animal down to two or three lines.  One line is even better.  In this painting, I simplified down to two closed lines: the body and the face.  Once you’ve got your shape down, prepare the background of your painting by tearing up strips of paper and applying them to the canvas.  It can be paper from an old book, a magazine of maybe even gift paper.  Inspiring yourself from the paper you have just chosen, use a hint of color in the white paint that will be apply to cover the entire background.  It can be opaque or translucent.  Now you can draw the simplified version of your animal with a charcoal or lead pencil.  Paint your animal with the colors of your choice and work the background creatively by inspiring yourself from the shapes and colors of the strips of paper that have been applied previously to the canvas.  Smudge oil pastel on painting and etch designs in it if you want.  You could also stamp the background and play up empty vs. full spaces.
P6190008
Ma belle Chanelle (My beautiful Chanelle)
Use the glue gun technique again, but paint the outline instead of drawing it with permanent felt pens.  To create the background, use soft gel and apply a thick coat with a painting knife, making sure to create a lot of texture.  Paint animal with acrylics and add doodles.  When background is dry add a few washes of colors.  The texture will prevent the paint from drying uniformly, creating an interesting background.  Finally, the clouds where painted on which the cat is sitting and the doodles repeated.
P6190006
Bulles de rêves, bulles de chats (Dream bubbles, cat bubbles)
Again, the glue gun technique is used and the rest was painted using acrylics.
Share/Bookmark

Scrapbooking layouts

More layout ideas for scrapbooking pages

DSC00324
DSC00326
DSC00327
DSC00329
DSC00332
DSC00333
DSC00335
DSC00336
Share/Bookmark

Monday, June 20, 2011

Scrapbooking my vacations


I’ve been pretty busy these last 6 months trying to scrapbook all my vacations in the last year.  Well, I’ve succeeded! And I have tons of pages to show off.  I’m going to start posting some today and in the following weeks.  Hope you get tons of inspirations from the pages. 
Happy scrapbooking!

DSC00314
Paper and embellishments: Royal Caribbean; paper ribbon: Creative memories; brads: unknown.
DSC00316
Paper and embellishments: Royal Caribbean; paper ribbon: Creative Memories.
DSC00322
Paper: Royal Caribbean; tag, paper flowers and paper ribbon: Creative Memories, Fabric flower: Prima.
DSC00317
Paper and embellishments: Creative Memories; dies cuts: unknown.
DSC00318
Everything: Creative Memories
DSC00319
Everything: Creative Memories
DSC00320
Paper: Creative Memories, Flowers: Prima.
DSC00323
Everything: Royal Caribbean.
Share/Bookmark

Wednesday, April 27, 2011

Mix media: Working with metals

This is a work of art that I made last fall.  I`m finally getting around to posting it!  I really enjoyed trying these new techniques: embossing metal, hand carving in metal, adding metal elements to canvas, using metallic felts and shaping metal wire.

I really enjoyed creating this one. It was full of new discoveries. This is a semi-abstract painting about a forest.  And its all about exploring texture in metal.

Metal Forest
 Here is a side view so that you can get an idea of how dimensional it is.  You can really see how the green metal wire pops out of the canvas.

Sideview
 This next picture shows parts of the two metals pieces that I embossed using an embossing tool. I added little details such as the little circles in the middle of the lozenge by poking the underside of the metal with the round end of a needle.  Careful: if you press to hard, you`ll make a hole!  I also added metallic colored paint on the metal.  To make it adhere better, I had to sand it down a little.  The second metal piece (bottom one) was also embossed using an embossing tool and painted with metallic colors.

Closeup
I made this ''fleur de lys'' using a stencil and a crayon-like embossing tool.  I followed the edges of the stencil, and chose not to fill in the middle.  I also punched out a hole in each corner.  To adhere the metal plate to the canvas I used a glue gun.  Once it dried, I colored over the glue with a permanent gold metallic felt.  I really love how it looks.

Closeup
This next picture shows the trunks of the trees and some grass growing in front of the tree line.  The trees were also cut with normal scissors and then embossed. I made sure to emboss in different directions to create some diversity.  I put the trees against the lighter side of the background to create a greater contrast.
The bottom grass background was created by embossing with a tool and the grass itself was hand carved out of the metal.  I lightly added paint to the grass to contrast with the background.

Closeup
Finally, I added these four metal pieces which are eyelets into the canvas.  I really liked the glue on the ''fleur de lys'', so I put some around the eyelets too.  I added a touch of gold glitter glue in the middle, and some stars over the forest were created.  I also added some wired mesh under the green wire.  This has an aesthetic function as well as a practical function.  I needed something to keep the wire in place.

Closeup

Hope you enjoyed!

Krysthle Poitras

Share/Bookmark

Monday, April 25, 2011

Black and white: cells and planets

I've been painting as usual.  I just finished taking a creative class called : Black and White, cells and planets.  It was fun even though black and white isn`t really my thing!

These two next mix-media paintings are my favorite ones.  The first is called "Puckered up" because it reminds me of a little puckered up face.  Maybe after eating a really sour candy?  I used string gel to create those smooth and unbroken white circle lines.  Also, I used several different types of fabric and paper to create the circles.  The objective was to create texture.  This painting was also just an exercise, but it turned out great!


Puckered up
  This next one was created over a previous exercise that I had done when exploring textures and materials.  I really didn't like the exercises end result.  I also had a lot of leftovers from cutting so many circles out of all these papers I used for another painting.  I figured that one ugly exercise + a lot of left over paper could = something interesting.  Indeed, it turns out that this is one of my favorite mix-media paintings ever! 

I really like how things from the exploration/exercise I did peer out from under all that paper.  I also like it because it's really 3D.  I call it "Squares and Cells".

Squares and cells

This next one is called "Comet", and if you haven't guessed why, it's because of the frilly tail that is located under the circle.  Now you might have a hard time figuring out the shape of this one, it's because the circle does indeed poke out of the canvas.


Comet

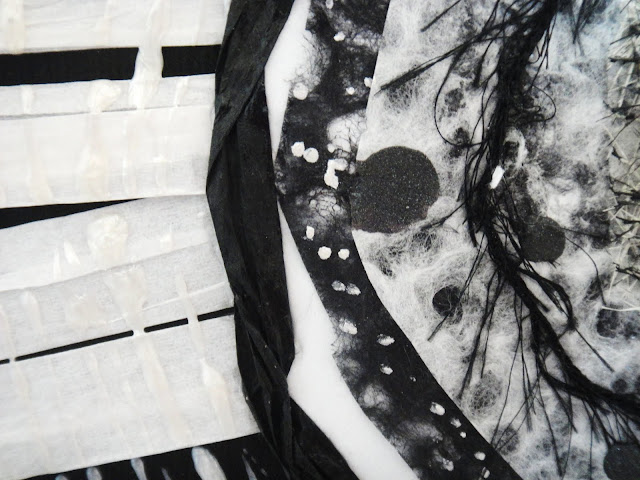
The closup reveals the materials used: some frilly ribon, fiber paper, some black and white lace papers, and black and white paper ribon.  I also used the string gel with some pearl colored acrylic paint over the white paper ribbon.


Comet closeup
This next one is called "The sheep". It"s pretty self-explanotory.


The Sheep

I put this closeup so that you may see the material used.  It's really paper maché material that hasen't been soaked in water.  To make it stay put, I put some acrylic medium over it.

The sheep closeup

This painting is called "Three little moons", because it reminds me of a planet with three moons in the sky.  An interesting tidbit about his painting is that I intentionally left some lace paper peer out from the edges.

Three little moons

And the last painting is called "Three little cells".  I used so many different kinds of paper to do the cells, which is what makes it neat.

Three little cells

Hope you enjoyed!
Krysthle Poitras


Share/Bookmark